Inside a Telefunken S600 Belt-Drive Turntable
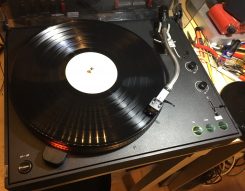
I hadn’t intended to end up with more than one turntable, but I now have no less than four, all of which work. The most recent one I’ve been working on is a Telefunken S600, which turns out to be an exceptionally well-designed turntable with a number of ingenious bells and whistles.
As I detailed previously, I wanted to replace the standard tone arm on a Lenco L75 turntable with an Ortofon AS-212. These are found (amongst other places) on Telefunken S600 belt-drive turntables, so I sourced one from Germany to steal the arm — but fellow members of internet groups I belonged to were horrified that I would do this to an actually rather nice turntable. So I relented, and one of my correspondents found a New Old Stock AS-212 that I duly installed on the Lenco.
Meanwhile, the S600 arrived from Germany, in rather a sorry state. Despite being very well packed, the plastic cover was cracked almost in two and the back of the arm had gone missing along with the counterweight. The well-known international shipping company had both damaged it and mis-delivered it: the incorrect recipient had opened it and lost some of the bits. So when it got here I wouldn’t have been able to pinch the arm for the Lenco anyway.
But now I had learned that these decks were actually quite good, I decided to attempt to repair it. And if it was actually a good deck, I might want to use it as my main deck — in which case it needed a modification to run at 78rpm.
Fixing the arm
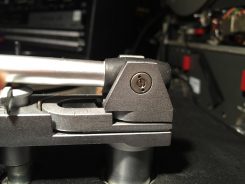
The big problem was the arm itself. This consists of an S‑shaped arm tube with a bearing housing on the end made of some mysterious hard rubbery material. A small tube containing two sets of four 1.2mm ball bearings goes transversely through the housing and is held in place by two pointed set-screws that have to be set up exactly right so that the arm sits centrally in its holder with freedom to move up and down but with no play. The housing has an extension stub on the back, and on to this mounts a threaded tube on to which the counterweight screws. In this case, the stub had snapped off the back of the bearing housing and with it had gone the threaded tube and counterweight.
There were several possible solutions. Replacement bearing housings are available on eBay from time to time, made either of Delrin or brass. The threaded tube is available too. I could replace the bearing housing (get the housing off the arm tube, push the bearing tube through and put it into the new one, add the threaded tube and reattach the arm). I could consider getting a threaded tube and fitting something inside it that I could push into the back of the bearing housing and glue it in place. I got the bits to do the latter, namely the threaded tube and some metal-filled resin. But the procedure seemed a bit dodgy, frankly. Would it stay stuck? Would the resin go where it shouldn’t? Would it look decent? I looked for a new bearing housing instead, but found only brass ones, which seemed like overkill to me — the black Delrin ones didn’t seem to to be available at the time. But then a contact of mine kindly came up with a solution: a complete replacement arm with the arm tube, bearing housing (with bearings) and threaded tube — plus an original counterweight. Excellent. All I had to do was to fit the arm — and send the old one back to him.
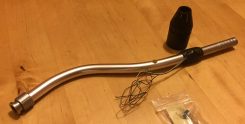
The replacement arm assembly duly arrived, and is shown here. The supplier very kindly taped up the bearing housing so the balls couldn’t fall out (I had obtained some spares in case they did, but I didn’t need them). First I needed to de-solder the arm leads, which meant getting the turntable out of its plinth.
This simply required undoing three screws. Telefunken really designed these turntables thoughtfully. You lift up the turntable, turn it vertically and then you can slide it into grooves in the plinth where it stands safely so you can work on it.
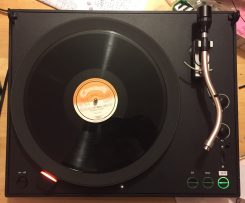
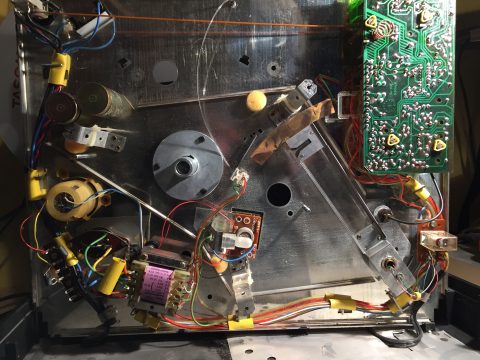 Here’s the innards of the turntable, and there are a lot of things to talk about here in due course. Click on the image to see it up close. I de-soldered the arm wires (they attach to a terminal strip bottom right next to the muting relay) and then put the deck back in the plinth. I had armed myself with a pair of tiny circlip pliers with 1mm prongs to fit the lock-nuts surrounding the bearing set-screws (one set of both on either side — you can see them in the broken original arm image above) and now attempted to loosen them. Pleasingly they loosened surprisingly easily and I was then able to unscrew the set-screws enough to carefully lift the arm out. Thankfully the little ball bearings stayed in there too. So I taped it up ready to send off. The new arm went in with surprisingly little trouble too. First I led the wires through the arm column by putting them into a drinking straw and pushing that down the hole in the centre of the column. Then, using a business card as a feeler gauge to centre the arm in the mounting, I held the arm in place and gently tightened the screws. Then holding the screw in position with a screwdriver I tightened the locknut, first on one side, then the other. It took about three goes to centre the arm successfully and lock the screws in place, but the result was an arm that exhibited negligible resistance when moving in its bearings. Exactly what was required. This pic shows the new arm in place minus the counterweight.
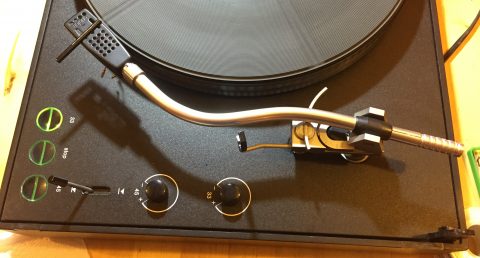 The turntable was now back more or less to its original specification, give or take. I ran it up and found that it reached 33 or 45 very quickly considering the weight of the beautifully-balanced platter, and the speeds were rock solid. The touch buttons for speed and stop all worked as intended and the speed control trimmer knobs worked well. I hadn’t even had to replace the electrolytic capacitors. (If I had needed to, the information required – along with lots more about these turntables – is here.)
Bells and whistles
This turntable has several bells and whistles. The main ones are to do with the arm lift. This can be actuated manually with the lever — there is a Bowden-style cable from the lifter lever to a fluid-damped dashpot under the arm rest. There is a locking arrangement that only lets the lever lock in the down position if the turntable is under power, and if you hit Stop it lifts up the arm (and when the arm is lifted, incidentally, the relay mentioned earlier mutes the audio).
It is also intended to lift the arm at the end of a side. This is accomplished in a rather ingenious way. Look at the photo of the underside above and you’ll see that there is a slotted copper arc just to the left of the motor control board. This is attached to a very lightweight arm that is linked to the tonearm, and swings across under the turntable as the arm tracks a disc. Just next to the copper arc (which we’ll come to in a moment) is a V‑shaped cutout. This is the clever bit. When the arm reaches the end of a side, that V passes between a big frosted bulb (just below the centre of the image) and a light-dependent resistor, shading it from the light. (Why the V I don’t know: it will mean that the illumination drops slowly rather than at once. Why?) This is detected and hits Stop on the turntable, which also powers-down a solenoid to release the arm-lifter to lift the arm. That is what is supposed to happen, but unfortunately it didn’t work. In fact it is a little surprising that the turntable would run without holding a button down. The bulb had expired. 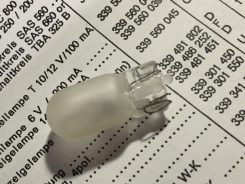 It looks very much like a W5W auto bulb but it’s only supposed to take 100mA. Luckily there are W5W replacement LED bulbs that run that kind of current so I popped one in. On power-up this duly illuminated, and now the arm lifted and the turntable stopped somewhat before the arm reached the end of its travel, corresponding to just before the locked groove on a disc.
While we are looking under the turntable, let’s look at what that copper arc does. As the arm swings, it stops the light from another, smaller bulb, directly to the right of the main bearing, from falling on the end of a light-pipe — that little clear tube going up to the top of the deck and past the orange string (which is the interlock between the power switch and the arm lifter). It ends in a little bezel on top of the deck. The light is thus visible from above the deck except when it’s obscured by that copper arc — which means the light is visible when the arm is beyond the platter and when the light can shine through the three slots in the arc, which correspond to the edges of a 7in, 10in and 12in disc. So basically it tells you where to put the arm for the start of a disc.
I thought the drive belt a little stretched and worn so obtained a replacement from thakker.eu (for the S500, a simpler version of this turntable, but with the same motor/subplatter arrangement).
A speed mod
With the deck returned to its original specification, next came the modification I wanted to perform — to get it to run at 78rpm as well as 33 and 45. I had asked about this in the Vinyl Engine online forum and a gentleman had kindly looked at the circuit diagrams I had found and suggested how to do it. It turns out that this design of turntable was actually licensed from Philips, though Telefunken made some extensive subsequent modifications. It’s a DC servo-controlled motor arrangement, and in some of the original Philips models using the same motor and control board design, the turntable can actually do 78 rpm right out of the box — so there was no reason why this shouldn’t work.
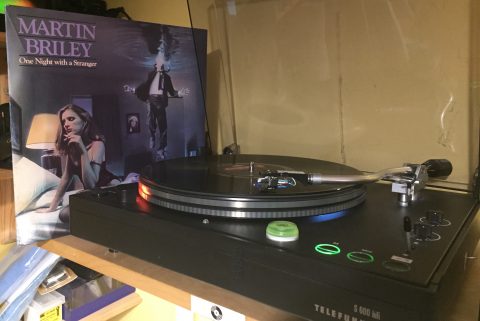
The answer, my respondent suggested, was to put a resistor across the main 45rpm speed control resistor (R133) to reduce its value, then use the 45rpm speed knob to fine-tune the speed to 78. I decided to go a little beyond that and put a trimpot in series with the fixed resistor so that I could set the speed to 78 with the 45rpm speed control knob in the centre position as it was for 45, and not have to adjust anything unless I wanted to run at a special speed like 80rpm for example. It took some experimentation to get the values right: eventually I used a 47k? fixed resistor in series with a 10k? trimmer. I soldered these to a miniature DPDT toggle switch that I mounted in the lower right-hand side of the plinth, with a hole to access the trimmer, and a LED and series resistor, powered from the lamp supply, on the other poles of the switch so a red light comes up when you select 78. And it works beautifully — here’s a Conroy music library 10in 78 spinning at the right speed!
Finally, I replaced the audio output cable, adding a pair of Neutrik phonos in place of the original 5‑pin DIN, and ran a chassis ground wire along the audio cable with a spade connector on the end. In fact this is of limited use as the mains on the turntable goes via a double-pole switch straight into a double-wound transformer: the chassis and all the audio grounds are connected together and have no connection to the mains side. Untangling this to provide separate audio and chassis ground turned out to be a real pain — to retain the muting relay function would have required serious rewiring — so I left well alone, and in fact it works fine, and the chassis can be connected to mains earth if desired.
The turntable has a cast stroboscope at the edge with its own neon lamp, but of course it doesn’t include 78, so I printed out an image of an old Garrard strobe for now and that works fine — maybe I’ll pick up one of the Lenco metal ones at some point.
In operation
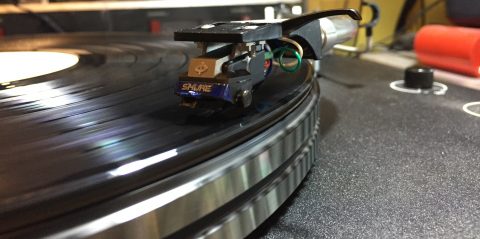 So, now to try the turntable out. I mounted the Shure M97xE in a skeleton headshell originally acquired for my TT-100 and set it up for 16mm overhang (tricky as you can’t move the arm to the centre spindle: I cut a piece of wire to length as a measure) and lined it up with a cartridge protractor: it lined up perfectly. Setting the tracking weight and anti-skate accordingly, I played a tone disc with the arm at different positions and the waveform and sound were clear and undistorted throughout. I then played some music, and found this under-recognised turntable, believed by many to out-perform many other belt-drive turntables of the period such as those by Thorens, was a marvellous performer, delivering an excellent, open and stable sound just as I would like it.
The only problem I have now is what to do with all these turntables. I really don’t want to get rid of either the Lenco or the Telefunken and I think the former will end up on the main system downstairs while the Tele stays in my studio for transcription (alongside the excellent Technics SL‑7 linear tracker, which doesn’t do 78).

